Connecting Train Horn To The OEM Horn (2017+ F250/F350)
Tap the factory horn wire on a 2017+ Super Duty so the steering wheel fires your HornBlasters kit.
What you need: assembled horn kit, T-tap / Scotchlok, 18-gauge lead, optional dash toggle
2017+ Ford F250/350
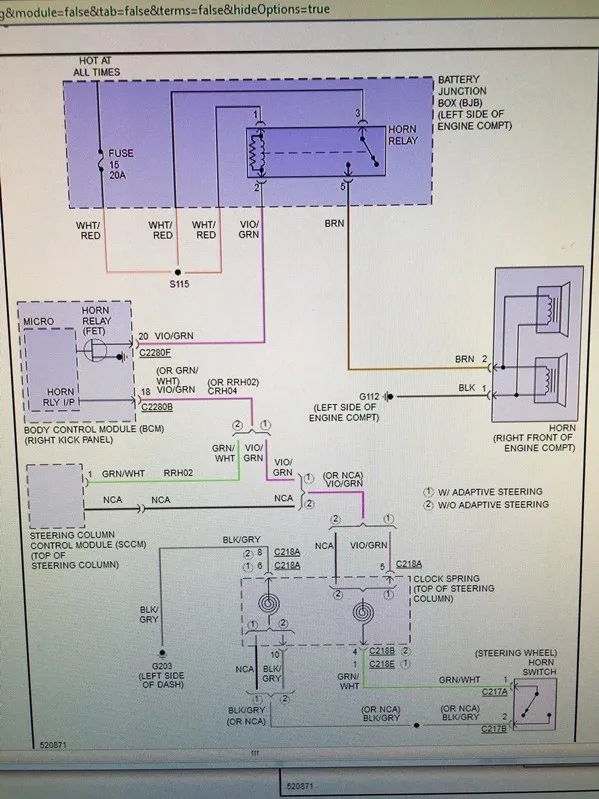
You've got your horn kit assembled and you're almost ready to make some noise. If you're having trouble finding the OEM wire to tap into, this article serves to help you out. Check out the schematic below. If you're not familiar with these, don't worry, we've got you covered.
Factory horn schematic for 2017+ F-250 / F-350.
Getting Started
1
Identify the OEM horn wire
This guide will require you to splice or tap into a specific wire for the horn. Looking at the diagram above, the horn wire for your vehicle is brown. Locate the OEM horn under the hood and look for a two-wire connector going into the horn. The wires may be wrapped in electrical tape of some sort. Peel the tape back to reveal the two leads. Look for the yellow wire.
2
T-tap a new 18-gauge lead
Use the included T-tap connector to splice a new 18-gauge lead off the yellow horn wire. The negative lead is black. Do not splice into the black wire. If you're not sure about how to do this, please see the following video.
3
Route to the valve (optional toggle)
Once you've got your new lead tapped off the OEM horn, route it back to our train horn valve. You can use a toggle switch between the valve and OEM horn to turn the train horn on and off at the wheel. With the switch off, the wheel just honks the OEM horn. When you flip the switch on, the wheel honks the train horn along with the stock horn.
You have reached the last of this Ford article in this category
You can go back to the help center and browse other categories or review the previous ones.
 Skip to content