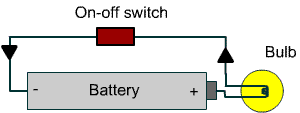
ELECTRICAL TIPS

12-Volt Wiring

Overview

HornBlasters horn kits are designed to work on most modern vehicles that operate with a +12v electrical system. This article serves to help you with the wiring/electrical portion of your installation.

When working with 12v electronics, your circuit must always have a positive and negative. When you complete the circuit by connecting the positive/negative wires to their respective terminals, the power flows in a loop. Check out the illustration below for a visual representation of how this works.

illustration of a switch

Power from the battery flows from the positive terminal to the bulb, and back to the negative terminal. When the switch is flipped on, the power from the battery is able to flow in a loop. When the switch is turned off, this loop is broken and power no longer flows through the bulb (and the bulb turns off). The same basic concept applies to HornBlasters horn kits.


Grounds (-)

Too most, the first thing that comes to mind when you think of an electrical ground is just a piece of metal. So what makes a ground point a ground? On any vehicle, the battery negative terminal is connected directly to the frame of the vehicle. Since the frame is solid steel/metal and conducts electricity, the entire frame essentially becomes a ground point for the battery. Okay, so why does that matter?

If your compressor is connected to the battery positive terminal, but the ground is connected to the bed of your vehicle, there's a good chance that the bed has rubber mounts between it and the frame cuasing a bad ground. Therefore, your compressor will never run as there is no 'loop' to the battery. When you ground the compressor to the frame, the metal frame allows that current to flow back to the battery negative and complete the loop. When this happens, the compressor kicks on and begins to pump air. If your compressor runs fine when connected to the battery but not when it is mounted in it's install location, the ground point could be poor/insufficient.

You can verify that your ground point is good with a multimeter/voltmeter. With your meter in hand, set the knob to read ohms. Take one probe of the meter to the negative terminal on your battery, and the other probe to the ground point you are using for your compressor/accessory. If your meter measures less than 5 ohms, your ground point should be sufficient to use. If you read more than 5 ohms with the meter, your ground point is a point of resistance and will not allow the power to flow efficiently between the battery and compressor. If the compressor runs with an ohm reading above 5, your wires will likely start to get warm from the increased resistance and may lead to issues down the road. The more resistance, the less efficient your system becomes and your compressor will not run as intended.


Crimp Connectors

Believe it or not, there's more to using a crimp connector than just smashing your wire into the connector and squeezing it tight with pliers.

There is a correct size for every wire gauge and a correct crimping die to match. Insulated terminals are selected by a range of sizes noted by the color of the insulation.

Red 22-16 AWG
Blue 16-14 AWG
Yellow 12-10 AWG
Electric Terminals

How to Properly Crimp

A good crimp starts with a properly stripped wire. You don't want to expose too much of the wire, otherwise you will have copper leads sticking out of your connector. These leads can make contact with other wires and create problems. If your stripped portion is too short, the wire won't make a good connection inside the connector and it won't work.

Proper Wire Connector Connection

Once the wire has been stripped, carefully insert it into the crimp connector. Make sure there are no loose strands of wire outside the insulation or terminal crimp.

crimped electrical terminal

Only one side of the crimp should be compressed, and which side depends on the terminal. For all barrel-type terminals, the kind that makes a complete circle, the crimp indentation goes to the solid side, NOT where the two ends meet.
crimped electrical terminals

ring terminals

This means that the two tabs with a split in the middle will be crimped down towards the solid side of the terminal. Make sure to fully crimp the wire into the connector, but do not apply too much pressure. The connector can tear in half rendering it useless. Give the wire a light tug to ensure it is secure and properly crimped. If the wire moves at all, remove the leads from the connector and open the crimp with a pair of pliers. Follow the steps above again.