Connecting Train Horns To The OEM Horn (2015–2020 GM Truck / SUV)
Use a MICRO2 add-a-circuit on the horn fuse so a 2015–2020 GM truck or SUV steering wheel fires your train horns.
What you need: assembled horn kit, MICRO2 add-a-circuit with extra 10A fuse, 18-gauge wire, optional dash toggle
2015–2020+ GM / Chevy SUV or Truck
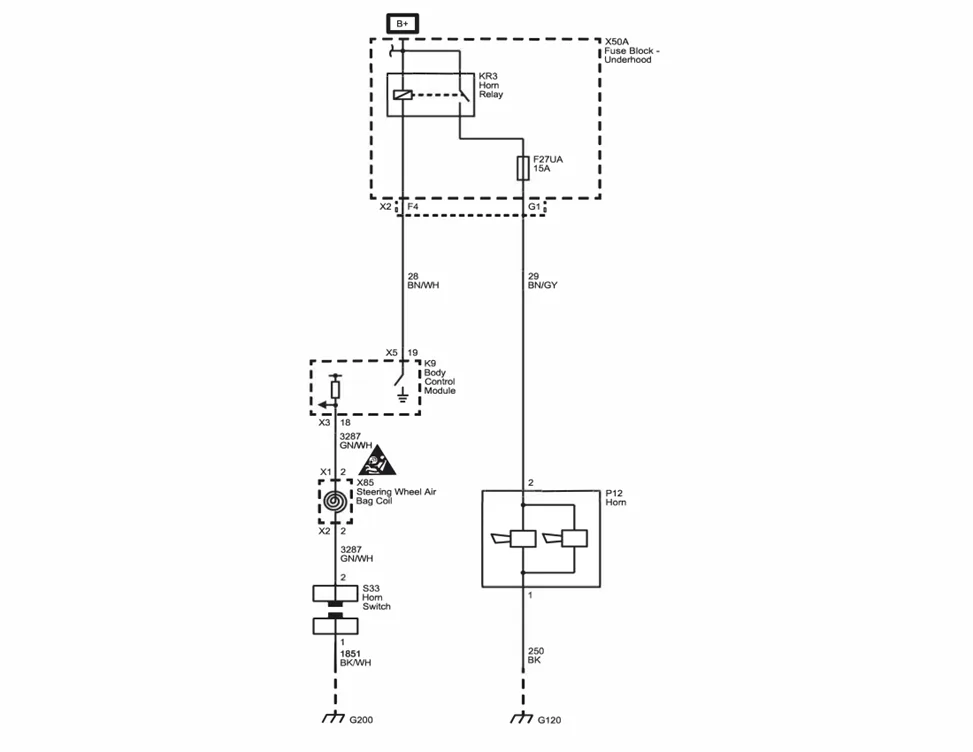
You’ve got your horn kit assembled and you’re almost ready to make some noise. If you’re having trouble finding the OEM wire to tap into, this article serves to help you out. Check out the schematic below. If you’re not familiar with these, don’t worry, we’ve got you covered.
Factory horn schematic for this vehicle.
Getting Started
This guide does not require you to splice or tap into any specific wire. Instead, we will pull power from the horn fuse. The horn fuse on these vehicles is only hot when the steering wheel is pressed. This makes it much easier to wire the train horns to the OEM horn. Your vehicle uses a MICRO2 type fuse. We recommend using an add-a-circuit to tap into this fuse. You can purchase one of these at a local auto store, or online at Amazon. Make sure that the connector comes with an extra fuse. If not, you will need to source a 10-amp MICRO2 fuse.
Once you have sourced the proper add-a-circuit, we can get started with the wiring process.
1
Disconnect the battery negative
Start by disconnecting the negative terminal of your car battery. This will prevent any issues from occurring after we wire this up.
2
Find the HORN fuse
Remove the cover from the fuse box in the engine bay. Check the back of the cover for a layout of the fuses. You are looking for the HORN fuse.
If you can’t find your horn fuse, refer to the diagrams at startmycar.com.
3
Pull the OEM fuse and insert the add-a-circuit
Use a fuse puller or needle-nose pliers to remove the fuse from the fuse box. Do not throw the fuse away — you will need it for the add-a-circuit connector.
Insert your add-a-circuit into the horn fuse location. Place the original horn fuse into the add-a-circuit. This fuse goes into the terminals closest to the blades that went into the fuse box.
4
Install the accessory fuse and wire
Insert the 10-amp fuse into the terminals on the outside of the connector (as shown below).
Strip one end of the supplied 18-gauge wire and crimp it into the butt connector on the end of the lead coming out of the add-a-circuit.
10-amp fuse into the terminals on the outside of the connector.
5
Optional toggle, then valve power
Optional: If you want to turn the train horn on/off, route the 18-gauge wire out to a toggle switch. Connect the opposite lead of the toggle switch to the positive lead on our train horn valve. If not, skip ahead and run the wire straight to the valve.
Route the 18-gauge wire from the add-a-circuit to the positive wire on our train horn solenoid valve.
Make sure the opposite lead on the valve is routed to the frame of the vehicle as a ground.
Check your wiring for any loose connections or frayed ends. Reconnect the battery negative terminal to the battery and press your steering wheel. The train horns should honk if there is air present in the tank.
You’ve reached the last vehicle article in this category
Continue with Public Address system wiring, or return to the Help Center.
 Skip to content